As a developer, you’re probably familiar with the LAMP stack—Linux, Apache, MySQL and PHP—open-source components for building dynamic websites and web applications. In recent years, LAMP has given way to MERN—a development stack used to build scalable web and mobile applications.
Hire the best developers in Latin America. Get a free quote today!
Contact Us Today!In this MERN stack tutorial, you will learn how to develop a full-stack MERN application with the most current tools available.
Before you begin, make sure that you are familiar with Node.js and React.js basics. This tutorial was verified with Node v14.2.0, npm v9.2.0, mongodb-community v4.4, express v4.18.2, and react 18.2.0, and mongoose v6.8.0.
Looking for pre-vetted MERN Engineers that work in your timezone? check out our nearshore staff augmentation services.
Table of Contents
- What Is the MERN Stack?
- How to Get Started with the MERN Stack?
- Step 1—Install Node
- Step 2—Create a New Node Project
- Step 3—Create a Node.js Express Server
- Step 4—Install Mongoose and MongoDB
- Step 5—Connect to MongoDB database
- Step 6—Create the Server API
- Step 7—Create a React Application
- Step 8—Set Up the React Router
- Step 9—Create the React Components
- Step 10—Testing the Application
- Conclusion
What is the MERN Stack?
The MERN stack is a web development framework comprised of the following open-source components:
MongoDB, a document-oriented NoSQL database known for its scalability, rich queries, and auto-sharding.
Express.js, a Node.js web application framework that handles a lot of the HTTP logic out of the box.
React.js, a popular JavaScript library that can be executed either in the browser or on the backend server within Node.js
Node.js, an execution environment for event-driven, server-side, and networking.
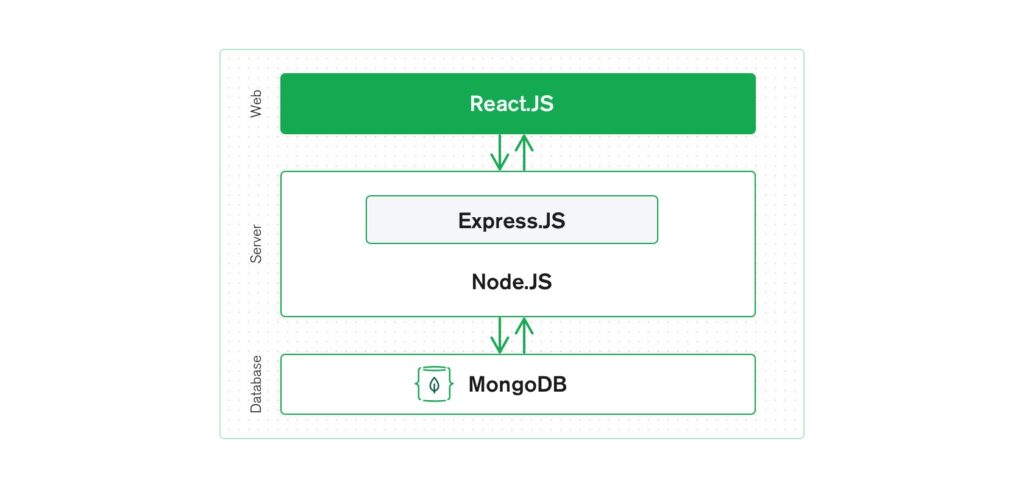
As you can see, MERN is a full-stack JavaScript framework comprising a front-end, back-end, and database for storing the data. When you use the MERN stack, you work with React to implement the presentation layer, Express and Node to make up the middle or application layer, and MongoDB to create the database layer. The beauty of MERN is that it’s based on a standard development language—JavaScript—for both server-side and client-side execution.
This combination means that JSON data flows naturally from front to back, making it fast to build on and reasonably simple to debug. The standardization also gives organizations greater flexibility when it comes to hiring developers and grants the advantage of not having to switch contexts while writing client side and server side code. Developers also report that coding in JavaScript delivers performance improvements.
Like any web stack, you can build whatever you want in MERN, though it’s ideally suited for cases that are JSON heavy, cloud-native, and that have dynamic web interfaces. A few examples might be: Workflow management, news aggregation, to-do apps, calendars, interactive forums, or social products. And whatever else you can dream up.
How to Get Started with the MERN Stack
MERN lets us create full-stack solutions. So, to leverage its full potential, we will be creating a MERN stack project. For this project, we will create both a back end and a front end. The front end will be implemented with React and the backend will be implemented with MongoDB, Node, and Express. We will call the front end client and the back end server.
To get started, you will need to do the following:
Step 1—Install Node
To install Node, go to https://nodejs.org/en/ and download either the LTS version or the current version.
Step 2—Create a New Node Project
With Node.js and MongoDB already installed, it’s time to create a project directory for your Node project. Open a new terminal window and create a new Node project directory in any convenient location on your local machine and switch to that directory by executing the following code:
> mkdir myProject && cd myProject

> mkdir server && cd server
Initialize a new Node.js project with the following code:
> npm init -yA new package.json file will be created. This file will contain some information about your app and the dependencies that it needs to run.
Install the dependencies:
> npm install express cors dotenvThe command above uses a couple of keywords:
- express installs the web framework for Node.js. (It will make our life easier.)
- cors installs a Node.js package that allows cross origin resource sharing.
- dotenv installs the module that loads environment variables from a .env file into process.env file. This lets you separate configuration files from the code.
We can check out the installed dependencies using the package.json file. It should list the packages along with their versions.
Step 3—Create a Node.js Express Server
Start by creating a file called server.js and type the following code into it and save:
const express = require("express");
const app = express();
const cors = require("cors");
require("dotenv").config({ path: "./config.env" });
const port = process.env.PORT || 5000;
app.use(cors());
app.use(express.json());
app.use(require("./routes/record"));
// Get MongoDB driver connection
const dbo = require("./db/conn");

app.listen(port, () => {
  // Perform a database connection when server starts
  dbo.connectToServer(function (err) {
    if (err) console.error(err);

  });
  console.log(`Server is running on port: ${port}`);
});
Here, we are requiring express and cors to be used. const port process.env.port will access the port variable from the config.env we required.
Step 4—Install Mongoose and MongoDB
For this guide, we’ll be using MongoDB Atlas cloud-based database-as-a-service free tier which is the easiest way to get up and running with MongoDB. We will utilize Mongoose as the frontend to your MongoDB database. Mongoose is a MongoDB object modeling tool designed to work in an asynchronous environment.
You can install Mongoose in your Node.js project (package.json) like any other dependency—using npm. To install it, use the following command inside your project folder:
> npm install mongooseThis command adds Mongoose and the MongoDB database driver that allows your Node.js applications to connect to the database and work with data.
Step 5—Connect to MongoDB Database
It’s time to connect our server to the database. Open a terminal window inside your ‘server’ directory and execute the following command:
> touch config.envYou need to assign the connection string to your MongoDB Atlas database to a new ATLAS_URI variable inside the config.env file.
In Atlas, navigate to your cluster and click CONNECT. This action will launch the Cluster Connection Wizard. The Wizard will prompt you to add your current IP address to the IP Access List and create a MongoDB user if you haven’t already done so. Be sure to note the username and password you use for the new MongoDB user as you’ll need them in a later step.
Next, the Wizard will prompt you to choose a connection method. Select Connect Your Application. When the Wizard prompts you to select your driver version, select Node.js and 3.6 or later. Copy the provided connection string.
Your file should resemble the one below:
ATLAS_URI=mongodb+srv://<username>:<password>@sandbox.jadwj.mongodb.net/employees?retryWrites=true&w=majority
PORT=5000
Note: Replace <username> and <password> with your database username and password.
Next, create a new folder under the server directory and name it ‘db’.
> mkdir db && cd dbInside it, create a file—conn.js. There we can add the following code to connect to our database.
> touch conn.jsconst { MongoClient } = require("mongodb");
const Db = process.env.ATLAS_URI;
const client = new MongoClient(Db, {
useNewUrlParser: true,
useUnifiedTopology: true,
});
var _db;
module.exports = {
connectToServer: function (callback) {
client.connect(function (err, db) {
// Verify we got a good "db" object
if (db)
{
_db = db.db("employees");
console.log("Successfully connected to MongoDB.");
}
return callback(err);
});
},
getDb: function () {
return _db;
},
};Step 6—Create the Server API Endpoints/ Routes
Database done. Server done. Now it’s time for the Server API endpoints. Let’s start by creating a routes folder and adding record.js in it. Navigate back to your “server” directory and create the new directory and file:
> cd ../server && mkdir routes
> touch routes/record.js
Paste the following code inside the routes/record.js folder:
const express = require("express");

// recordRoutes is an instance of the express router.
// We use it to define our routes.
// The router will be added as a middleware and will take control of requests starting with path /record.
const recordRoutes = express.Router();

// This will help us connect to the database
const dbo = require("../db/conn");

// This helps convert the id from string to ObjectId for the _id.
const ObjectId = require("mongodb").ObjectId;


// This section will help you get a list of all the records.
recordRoutes.route("/record").get(function (req, res) {
 let db_connect = dbo.getDb("employees");
 db_connect
   .collection("records")
   .find({})
   .toArray(function (err, result) {
     if (err) throw err;
     res.json(result);
   });
});

// This section will help you get a single record by id
recordRoutes.route("/record/:id").get(function (req, res) {
 let db_connect = dbo.getDb();
 let myquery = { _id: ObjectId(req.params.id) };
 db_connect
   .collection("records")
   .findOne(myquery, function (err, result) {
     if (err) throw err;
     res.json(result);
   });
});

// This section will help you create a new record.
recordRoutes.route("/record/add").post(function (req, response) {
 let db_connect = dbo.getDb();
 let myobj = {
   name: req.body.name,
   position: req.body.position,
   level: req.body.level,
 };
 db_connect.collection("records").insertOne(myobj, function (err, res) {
   if (err) throw err;
   response.json(res);
 });
});

// This section will help you update a record by id.
recordRoutes.route("/update/:id").post(function (req, response) {
 let db_connect = dbo.getDb();
 let myquery = { _id: ObjectId(req.params.id) };
 let newvalues = {
   $set: {
     name: req.body.name,
     position: req.body.position,
     level: req.body.level,
   },
 };
 db_connect
   .collection("records")
   .updateOne(myquery, newvalues, function (err, res) {
     if (err) throw err;
     console.log("1 document updated");
     response.json(res);
   });
});

// This section will help you delete a record
recordRoutes.route("/:id").delete((req, response) => {
 let db_connect = dbo.getDb();
 let myquery = { _id: ObjectId(req.params.id) };
 db_connect.collection("records").deleteOne(myquery, function (err, obj) {
   if (err) throw err;
   console.log("1 document deleted");
   response.json(obj);
 });
});

module.exports = recordRoutes;
It’s time to start your server to see if it works. Open your terminal in the same directory as your server.js file and type:
> node server.jsIf everything goes well, you will see the following output:
Server is running on port: 5000
Successfully connected to MongoDB.
That’s it for the back end. Now, we will start working on the front end.
Step 7—Create a React Application
To install your React application, execute the create-react-app command in your project’s root folder:
> npx create-react-app clientA new directory for your React frontend app will be created. Navigate to the client folder and check our React application code.
> cd client && lsOpen a new terminal window in the “client” directory, and install two additional dependencies:
> npm install bootstrap
react-router-dom
bootstrap lets you quickly deploy a template and components for your new web application without having to write the code from scratch.
react-router-dom installs React router components for web applications.
Step 8—Set Up the React Router
To set up the React Router, start by emptying the src folder:
> rm src/**/*Next, add two new files in it: index.js and App.js.
> touch src/index.js src/App.jsInside the src/index.js file, add the following code:
import React from "react";
import ReactDOM from "react-dom";
import App from "./App";
import { BrowserRouter } from "react-router-dom";
ReactDOM.render(
  <React.StrictMode>
    <BrowserRouter>
      <App />
    </BrowserRouter>
  </React.StrictMode>,
  document.getElementById("root")
);
We are using <BrowserRouter> to store the current location in the browser’s address bar and for keeping our UI in sync with the URL. This helps with seamless transitions when refreshing components.
Step 9—Create the React Components
Create a components folder inside the src directory. For each component we create, we will add a new .js file inside the components folder.
There are three things that the app needs to do:
– Create an employee
– Edit employees
– View all employees
For each task, we will create create.js, edit.js, navbar.js, and recordList.js.
> mkdir src/components
(cd src/components &&
touch create.js edit.js navbar.js recordList.js)
A snapshot of each file will look like the following:
create.js
The following code will serve as a creating component for our records. Using this component, users can create a new record. This component will submit a create command to our server.
import React, { useState } from "react";
import { useNavigate } from "react-router";

export default function Create() {
 const [form, setForm] = useState({
   name: "",
   position: "",
   level: "",
 });
 const navigate = useNavigate();

 // These methods will update the state properties.
 function updateForm(value) {
   return setForm((prev) => {
     return { ...prev, ...value };
   });
 }

 // This function will handle the submission.
 async function onSubmit(e) {
   e.preventDefault();

   // When a post request is sent to the create url, we'll add a new record to the database.
   const newPerson = { ...form };

   await fetch("http://localhost:5000/record/add", {
     method: "POST",
     headers: {
       "Content-Type": "application/json",
     },
     body: JSON.stringify(newPerson),
   })
   .catch(error => {
     window.alert(error);
     return;
   });

   setForm({ name: "", position: "", level: "" });
   navigate("/");
 }

 // This following section will display the form that takes the input from the user.
 return (
   <div>
     <h3>Create New Record</h3>
     <form onSubmit={onSubmit}>
       <div className="form-group">
         <label htmlFor="name">Name</label>
         <input
           type="text"
           className="form-control"
           id="name"
           value={form.name}
           onChange={(e) => updateForm({ name: e.target.value })}
         />
       </div>
       <div className="form-group">
         <label htmlFor="position">Position</label>
         <input
           type="text"
           className="form-control"
           id="position"
           value={form.position}
           onChange={(e) => updateForm({ position: e.target.value })}
         />
       </div>
       <div className="form-group">
         <div className="form-check form-check-inline">
           <input
             className="form-check-input"
             type="radio"
             name="positionOptions"
             id="positionIntern"
             value="Intern"
             checked={form.level === "Intern"}
             onChange={(e) => updateForm({ level: e.target.value })}
           />
           <label htmlFor="positionIntern" className="form-check-label">Intern</label>
         </div>
         <div className="form-check form-check-inline">
           <input
             className="form-check-input"
             type="radio"
             name="positionOptions"
             id="positionJunior"
             value="Junior"
             checked={form.level === "Junior"}
             onChange={(e) => updateForm({ level: e.target.value })}
           />
           <label htmlFor="positionJunior" className="form-check-label">Junior</label>
         </div>
         <div className="form-check form-check-inline">
           <input
             className="form-check-input"
             type="radio"
             name="positionOptions"
             id="positionSenior"
             value="Senior"
             checked={form.level === "Senior"}
             onChange={(e) => updateForm({ level: e.target.value })}
           />
           <label htmlFor="positionSenior" className="form-check-label">Senior</label>
         </div>
       </div>
       <div className="form-group">
         <input
           type="submit"
           value="Create person"
           className="btn btn-primary"
         />
       </div>
     </form>
   </div>
 );
}
edit.js
The following code will serve as an editing component for our records. It will use a similar layout to the create component and will eventually submit an update command to our server.
import React, { useState, useEffect } from "react";
import { useParams, useNavigate } from "react-router";

export default function Edit() {
 const [form, setForm] = useState({
   name: "",
   position: "",
   level: "",
   records: [],
 });
 const params = useParams();
 const navigate = useNavigate();

 useEffect(() => {
   async function fetchData() {
     const id = params.id.toString();
     const response = await fetch(`http://localhost:5000/record/${params.id.toString()}`);

     if (!response.ok) {
       const message = `An error has occurred: ${response.statusText}`;
       window.alert(message);
       return;
     }

     const record = await response.json();
     if (!record) {
       window.alert(`Record with id ${id} not found`);
       navigate("/");
       return;
     }

     setForm(record);
   }

   fetchData();

   return;
 }, [params.id, navigate]);

 // These methods will update the state properties.
 function updateForm(value) {
   return setForm((prev) => {
     return { ...prev, ...value };
   });
 }

 async function onSubmit(e) {
   e.preventDefault();
   const editedPerson = {
     name: form.name,
     position: form.position,
     level: form.level,
   };

   // This will send a post request to update the data in the database.
   await fetch(`http://localhost:5000/update/${params.id}`, {
     method: "POST",
     body: JSON.stringify(editedPerson),
     headers: {
       'Content-Type': 'application/json'
     },
   });

   navigate("/");
 }

 // This following section will display the form that takes input from the user to update the data.
 return (
   <div>
     <h3>Update Record</h3>
     <form onSubmit={onSubmit}>
       <div className="form-group">
         <label htmlFor="name">Name: </label>
         <input
           type="text"
           className="form-control"
           id="name"
           value={form.name}
           onChange={(e) => updateForm({ name: e.target.value })}
         />
       </div>
       <div className="form-group">
         <label htmlFor="position">Position: </label>
         <input
           type="text"
           className="form-control"
           id="position"
           value={form.position}
           onChange={(e) => updateForm({ position: e.target.value })}
         />
       </div>
       <div className="form-group">
         <div className="form-check form-check-inline">
           <input
             className="form-check-input"
             type="radio"
             name="positionOptions"
             id="positionIntern"
             value="Intern"
             checked={form.level === "Intern"}
             onChange={(e) => updateForm({ level: e.target.value })}
           />
           <label htmlFor="positionIntern" className="form-check-label">Intern</label>
         </div>
         <div className="form-check form-check-inline">
           <input
             className="form-check-input"
             type="radio"
             name="positionOptions"
             id="positionJunior"
             value="Junior"
             checked={form.level === "Junior"}
             onChange={(e) => updateForm({ level: e.target.value })}
           />
           <label htmlFor="positionJunior" className="form-check-label">Junior</label>
         </div>
         <div className="form-check form-check-inline">
           <input
             className="form-check-input"
             type="radio"
             name="positionOptions"
             id="positionSenior"
             value="Senior"
             checked={form.level === "Senior"}
             onChange={(e) => updateForm({ level: e.target.value })}
           />
           <label htmlFor="positionSenior" className="form-check-label">Senior</label>
       </div>
       </div>
       <br />

       <div className="form-group">
         <input
           type="submit"
           value="Update Record"
           className="btn btn-primary"
         />
       </div>
     </form>
   </div>
 );
}
recordList.js
The following code will serve as a viewing component for our records. It will fetch all the records in our database through a GET method.
import React, { useEffect, useState } from "react";
import { Link } from "react-router-dom";

const Record = (props) => (
 <tr>
   <td>{props.record.name}</td>
   <td>{props.record.position}</td>
   <td>{props.record.level}</td>
   <td>
     <Link className="btn btn-link" to={`/edit/${props.record._id}`}>Edit</Link> |
     <button className="btn btn-link"
       onClick={() => {
         props.deleteRecord(props.record._id);
       }}
     >
       Delete
     </button>
   </td>
 </tr>
);

export default function RecordList() {
 const [records, setRecords] = useState([]);

 // This method fetches the records from the database.
 useEffect(() => {
   async function getRecords() {
     const response = await fetch(`http://localhost:5000/record/`);

     if (!response.ok) {
       const message = `An error occurred: ${response.statusText}`;
       window.alert(message);
       return;
     }

     const records = await response.json();
     setRecords(records);
   }

   getRecords();

   return;
 }, [records.length]);

 // This method will delete a record
 async function deleteRecord(id) {
   await fetch(`http://localhost:5000/${id}`, {
     method: "DELETE"
   });

   const newRecords = records.filter((el) => el._id !== id);
   setRecords(newRecords);
 }

 // This method will map out the records on the table
 function recordList() {
   return records.map((record) => {
     return (
       <Record
         record={record}
         deleteRecord={() => deleteRecord(record._id)}
         key={record._id}
       />
     );
   });
 }

 // This following section will display the table with the records of individuals.
 return (
   <div>
     <h3>Record List</h3>
     <table className="table table-striped" style={{ marginTop: 20 }}>
       <thead>
         <tr>
           <th>Name</th>
           <th>Position</th>
           <th>Level</th>
           <th>Action</th>
         </tr>
       </thead>
       <tbody>{recordList()}</tbody>
     </table>
   </div>
 );
}
navbar.js
In the navbar.js component, we will create a navigation bar that will link us to the required components using the following code.
import React from "react";

// We import bootstrap to make our application look better.
import "bootstrap/dist/css/bootstrap.css";

// We import NavLink to utilize the react router.
import { NavLink } from "react-router-dom";

// Here, we display our Navbar
export default function Navbar() {
 return (
   <div>
     <nav className="navbar navbar-expand-lg navbar-light bg-light">
       <NavLink className="navbar-brand" to="/">
       <img style={{"width" : 25 + '%'}} src="https://d3cy9zhslanhfa.cloudfront.net/media/3800C044-6298-4575-A05D5C6B7623EE37/4B45D0EC-3482-4759-82DA37D8EA07D229/webimage-8A27671A-8A53-45DC-89D7BF8537F15A0D.png"></img>
       </NavLink>
       <button
         className="navbar-toggler"
         type="button"
         data-toggle="collapse"
         data-target="#navbarSupportedContent"
         aria-controls="navbarSupportedContent"
         aria-expanded="false"
         aria-label="Toggle navigation"
       >
         <span className="navbar-toggler-icon"></span>
       </button>

       <div className="collapse navbar-collapse" id="navbarSupportedContent">
         <ul className="navbar-nav ml-auto">
           <li className="nav-item">
             <NavLink className="nav-link" to="/create">
               Create Record
             </NavLink>
           </li>
         </ul>
       </div>
     </nav>
   </div>
 );
}
Now, add the following code to the src/App.js file that we created earlier.
import React from "react";

// We use Route in order to define the different routes of our application
import { Route, Routes } from "react-router-dom";

// We import all the components we need in our app
import Navbar from "./components/navbar";
import RecordList from "./components/recordList";
import Edit from "./components/edit";
import Create from "./components/create";

const App = () => {
 return (
   <div>
     <Navbar />
     <Routes>
       <Route exact path="/" element={<RecordList />} />
       <Route path="/edit/:id" element={<Edit />} />
       <Route path="/create" element={<Create />} />
     </Routes>
   </div>
 );
};

export default App;
Step 10—Testing
You have completed creating the components. You also connected your React app to the back end using fetch. fetch provides cleaner and easier ways to handle http requests. fetch is used in create.js, edit.js, and recordList.js as they handle http requests.
Close everything and start the app, using the following steps:
In a new terminal window, start by executing the following command in the ‘server‘ directory:
> node server.jsOpen a new terminal window in the client directory and run the following command:
> npm startYou should be able to view the application in your browser.
Conclusion
Congratulations on building your first MERN application. So far, you have learnt to integrate the four components of the MERN stack into your programming and how they work together to create fast and stable production environments. This course teaches how to use MongoDB for your document database, Express.js for your web framework and React.js for your client-side, and Node.js as the web server.
If you’re looking to hire nearshore LatAm developers skilled in developing MERN apps, check out our Nearshore Software Development services. Contact us today to build your nearshore team!