In this guide you will learn how to deploy a Python Flask and MongoDB application with Docker. The implementation uses Docker Engine and Docker-compose.
Hire the best developers in Latin America. Get a free quote today!
Contact Us Today!A lot of buzzwords mentioned may sound like the goal is quite complex but let’s break it down into simple steps and conquer them one by one.
What is Flask?
Flask is a Python web micro-framework that provides you with the tools, libraries and technologies you need to build a modern web application. A micro-framework is a framework with little to no dependencies to external libraries. This has pros and cons. Pros would be that the framework is light—there is little dependency to update and watch for security bugs. Cons are that sometimes you will have to do more work by yourself or increase the list of dependencies by adding plugins. Flask has the following dependencies:
What is MongoDB?
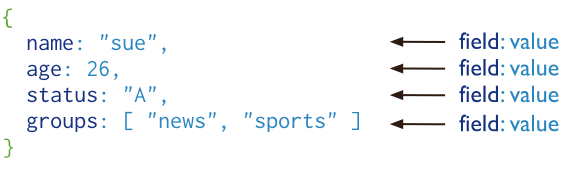
MongoDB is a popular open source database, but unlike other databases it’s classified as a NoSQL database. The term ‘NoSQL’ means ‘non-relational’. It means that MongoDB is a document-oriented database that stores data in flexible BSON (similar to JSON format) documents. This is different from the table-like relational database structure. Developers can think of MongoDB as a persistent repository of Python dictionaries. The following image illustrates a simple MongoDB document Structure:
The advantages of using documents are:
- Documents (i.e. objects) map to native data types in many programming languages.
- Embedded documents and arrays reduce the need for expensive joins.
- Flexible data model.
- The dynamic schema supports fluent polymorphism.
- Great at handling big data through horizontal scalability.
What is Docker?
Docker is an application that simplifies the process of managing application processes in containers. Containers let you run your applications in resource-isolated processes. They’re similar to virtual machines, but containers are more portable, more resource-friendly, and more dependent on the host operating system.
Why Flask, MongoDB and Docker?
Flask and MongoDB are popular choices for building web applications, and using Docker can help you take your app to the next level. By containerizing your app with Docker, you can easily manage dependencies and deploy your app to any environment with confidence.
If you’re new to Flask and MongoDB, getting started can seem intimidating. But using Docker can make the process much smoother by providing a consistent environment for development and deployment. In this tutorial, we’ll show you how to set up a Flask app with MongoDB and Docker from scratch.
Dockerize your Flask + MongoDB and Application
Prerequisites:
To follow along, you need to have:
- Familiarity with Python.
- Familiarity with standard code editors such as nano, gedit, vim, or emacs.
- Working knowledge of basic operating system commands.
- A Docker Hub account.
Step 1: Install Docker Desktop
Docker Desktop includes Docker Compose along with Docker Engine and Docker CLI which are Compose prerequisites. Compose is a tool for defining and running complex applications with Docker. You can use Docker Compose to define a multi-container application in a single file, then spin your application up in a single command that executes everything that needs to be done to get it running.
Follow the instructions in the following links to install Docker Desktop on:
Step 2: Create the Flask Application
Let’s build a simple tasks app where you can create, update, and delete simple one liner tasks. This data will be stored inside a MongoDB database. Complete the following steps on your local machine to create the Flask application files.
2.1 — Create a new project directory and switch to that directory with the following code:
$ mkdir flask-mongodb-containers && cd flask-mongodb-containers2.2 — Create a new file, app.py
Create a new file called app.py in your project directory and paste the following code:
from flask import Flask, request, jsonify
from flask_pymongo import PyMongo
from bson.objectid import ObjectId
import socket

app = Flask(__name__)
app.config["MONGO_URI"] = "mongodb://mongo:27017/dev"
app.config['JSONIFY_PRETTYPRINT_REGULAR'] = True
mongo = PyMongo(app)
db = mongo.db


@app.route("/")
def index():
    hostname = socket.gethostname()
    return jsonify(
        message="Welcome to Tasks app!"
    )


@app.route("/tasks")
def get_all_tasks():
    tasks = db.task.find()
    data = []
    for task in tasks:
        item = {
            "id": str(task["_id"]),
            "task": task["task"]
        }
        data.append(item)
    return jsonify(
        data=data
    )


@app.route("/task", methods=["POST"])
def create_task():
    data = request.get_json(force=True)
    db.task.insert_one({"task": data["task"]})
    return jsonify(
        message="Task saved successfully!"
    )


@app.route("/task/<id>", methods=["PUT"])
def update_task(id):
    data = request.get_json(force=True)["task"]
    response = db.task.update_one({"_id": ObjectId(id)}, {"$set": {"task": data}})
    if response.matched_count:
        message = "Task updated successfully!"
    else:
        message = "No Task found!"
    return jsonify(
        message=message
    )


@app.route("/task/<id>", methods=["DELETE"])
def delete_task(id):
    response = db.task.delete_one({"_id": ObjectId(id)})
    if response.deleted_count:
        message = "Task deleted successfully!"
    else:
        message = "No Task found!"
    return jsonify(
        message=message
    )


@app.route("/tasks/delete", methods=["POST"])
def delete_all_tasks():
    db.task.remove()
    return jsonify(
        message="All Tasks deleted!"
    )


if __name__ == "__main__":
    app.run(host="0.0.0.0", port=5000)
In the app.py file, we first import all the required modules and create instances of the Flask class (our app) and the PyMongo class (our database).
Note: The hostname in the MONGO_URI Flask configuration variable has been set to ‘mongo’ instead of ‘localhost’. This is because ‘mongo’ will be the name assigned to our database container since containers in the same Docker network can talk to each other by their names.
Our app contains six functions which are assigned URLs by @app.route() Python decorator. At first glance, it is easy to understand that the decorator is telling our app that whenever a user visits our @app domain at the given route(), execute the underlying function.
- index() – displays a welcome message whenever you hit the app.
- get_all_tasks() – displays all the tasks that are available in the database as a list of dictionaries.
- create_task() – creates a new task which is stored in the database with a unique ID.
- update_task(id) – modifies any existing task. If no task is found with the queried ID, an appropriate message is returned.
- delete_task(id) – removes that entry of the task having the queried ID from the database. Returns an appropriate message if no task with the specified ID is found.
- delete_all_tasks() – removes all the tasks and returns an empty list.
In the final section, where we run the app, we define the host parameter as ‘0.0.0.0’ to make the server publicly available, running on the machine’s IP address. The machine here I am talking about is a container. When it runs, this application binds to all IPs on the system (‘0.0.0.0’) and listens on port 5000, which is the default Flask port.
2.3 — Create a new file, requirements.txt
Edit the file and add the following code:
Flask==2.2.2
Flask-PyMongo==4.3.3
Then, save the file.
requirements.txt files are used to specify what Python packages are required by the application. For this minimal Flask application there are two packages that are required, Flask and Flask-PyMongo which will be installed when we build our Docker image. PyMongo is a Python distribution containing tools for working with MongoDB.
2.4 — Authorize Docker to authenticate with Docker Hub
Create a Docker Hub account, if you don’t have one and then authorize Docker to connect to the Docker Hub account using the docker login command as shown below:
$ docker login <Username>: <Password>Supply your username and password to authenticate with Docker Hub.
2.5 — Dockerize the Flask MongoDB application
Now, let us build a Docker image of our app which can be pushed to the Docker Hub registry. Inside our working directory flask-mongodb-containers, create a new file named Dockerfile. Edit the file and add the following commands to it:
# Set base image (host OS)
FROM python:alpine3.8

# Copy the content of the project directory to the working directory
COPY . /app

# Set the working directory in the container
WORKDIR /app

# Install any dependencies
RUN pip install -r requirements.txt

# Specify the Flask environment port
ENV PORT 5000

# By default, listen on port 5000
EXPOSE 5000

# Set the directive to specify the executable that will run when the container is initiated
ENTRYPOINT [ "python" ]

# Specify the command to run on container start
CMD [ "app.py" ]
We are using the official Python image, based on the Alpine Linux project, as the base image. The Python alpine image ensures the resulting container is as compact and small as possible. We are then copying the contents of our working directory to a new directory on the image. We are instructing the image to expose the port 5000 when run as a container, on which we can access our app. Finally, our app container is configured to run python app.py automatically when it is created.
At this point, your working directory flask-mongodb-containers should contain the following files:
$ tree
.
├── app.py
├── Dockerfile
└── requirements.txt
0 directories, 3 files
Step 3: Build your Docker container image
Complete the following steps to build and test the container image locally:
3.1 — Build the container using Docker
Execute the following command from the same directory as the Dockerfile:
$ docker build -t <username>/flask-container:1.0.0 .This command builds a container using the Dockerfile in the current directory with tag <username>/<image-name>:<version> format.
Note: Replace <username> with your Docker Hub username.
3.2 — Run the Container
Once the container build is done, test the Flask application locally by running the container.
$ docker run -p 5000:5000 <username>/flask-container:1.0.03.3 — View the application
After executing the previous command, the Flask app will run in the container and will be exposed to your local system on port 5000.
Browse to http://localhost:5000 or use curl from the command line and you will see “Welcome to Tasks App!”
$ curl localhost:5000Run the following commands to test your image locally:
$ curl localhost:5000/task

$ curl localhost:5000/tasks
Step 4–Push your image to Docker Hub
To make your image publicly available on Docker Hub so that anybody in the world can download and run it, run the following command:
$ docker push <username>flask-container:1.0.0Conclusion
You built a small Flask web application for managing tasks that communicates with a MongoDB database. You learned how to dockerize a Flask MongoDB application, connect Flask to a MongoDB database server, create collections that store a group of documents, insert data to a collection, and retrieve and delete data from a collection.
Using Flask, MongoDB, and Docker together can help you build powerful and scalable web applications. By containerizing your app with Docker, you can easily manage dependencies and deploy your app to any environment with confidence. Whether you’re a seasoned developer or just getting started with these technologies, following our step-by-step guide to setting up a Flask app with MongoDB and Docker can help you streamline your workflow and bring your web application to life.