

Most applications interact with data in some form, and Python is one of the go-to programming languages for building data-driven applications. Python’s popularity can be attributed to its simplicity, versatility, and extensive support for data science and machine learning applications. It has built-in modules and a rich ecosystem of third-party libraries for storing and accessing different data sources, from simple text files to complex databases to web APIs and even real-time data streams.
Hire the best developers in Latin America. Get a free quote today!
Contact Us Today!In this tutorial, you will create a small MySQL database for a movie rating system and learn to store and grab data using Python code. Using the concepts described in this tutorial, you will be in a position to integrate MySQL into any Python application.
What you’ll learn
- How to setup a Python development environment
- How to setup a MySQL database
- How to create tables declaratively using Atlas
- How to create a simple Python CLI application using Click
- How to add records and query the database to fetch required data
What you’ll need
To get the most out of this tutorial, you should have
- Basic knowledge of Python
- Basic knowledge of relational database concepts
- A PC or UNIX system with internet access
- Docker installed on your system. You can download Docker from the official Docker website: https://www.docker.com/get-started
Table of Contents
- What is Python
- What is Click
- What is MySQL
- What is Atlas
- Setting Up a Python Virtual Environment
- Installing the dependencies
- Install MySQL server
- Install Atlas
- Install Click
- Install MySQL Connector/Python
- Defining the Database Schema
- Creating the Python Click CLI Application
- Wrapping Up
What is Python
Python is a popular general purpose programming language. It has various applications for example:
- Web Development
- Software Development
- Scientific Computing / Data Science
- Machine Learning
- Connecting to Databases
What is Click
Click is a Python package that provides a simple and powerful way to create command-line interfaces (CLIs) for Python applications. It is a popular choice for many developers due to its ease of use, flexibility, and robustness.
What is MySQL
MySQL is one of the most popular database management systems (DBMSs) on the market today. It is widely used for application development and ranks second behind Oracle DBMS in popularity. MySQL uses Structured Query Language (SQL) to manage and manipulate data. It is known for its speed, reliability, scalability, and ease of use, making it a popular choice for businesses of all sizes, from small startups to large corporations.
What is Atlas
Atlas is an open-source tool designed to help software engineers, DBAs and DevOps practitioners to manage their database schemas. Atlas supports a declarative workflow to database schema management. Instead of figuring out the correct SQL statements to update their database schemas, users can declare their desired schema and Atlas will automatically generate a migration plan to move from the current state to the desired state—making it a kind of “Terraform for databases.”
Setting Up a Python Virtual Environment
It’s recommended that you set up an isolated virtual environment for your python project before installing any package. Let’s get started by creating a new folder in your $HOME dir
ectory for the application:
$ mkdir ~/cli-demo

$ cd ~/cli-demo
Install the virtualenv package:
$ pip install virtualenvCreate a new virtual environment by specifying a directory for it. For example, to create a virtual environment named “myenv” in the current directory, run:
$ virtualenv myenvFinally, to use the virtual environment, you will need to activate it by running the activate script.
On Windows:
$ myenv\Scripts\activate.batOn Unix or Linux:
$ source myenv/bin/activateInstalling the Dependencies
Install MySQL Server
Now, to start working through this tutorial, you need to set up a MySQL server. MySQL server will provide all the services required for handling your database.
Open a terminal or command prompt on your system and run the following command to download the MySQL Docker image from Docker Hub:
$ docker pull mysqlOnce the image is downloaded, use the following command to start a new MySQL container:
$ docker run -d --name cli-demo -p 3306:3306 -e MYSQL_ROOT_PASSWORD=pass -e MYSQL_DATABASE=movie-ratings mysqlThis command creates a new container with the name “cli-demo” and sets the root user’s password to “pass“. It also creates a new database called “movie-ratings“.
You can verify that the container is running by using the following command:
$ docker psA list of all the running containers on your system will be displayed, including the newly created MySQL container.
Finally, set the database connection variables by pasting the following code in your bash session:
export MYSQL_HOST=0.0.0.0
export MYSQL_PORT=3306
export MYSQL_USER=root
export MYSQL_PASSWORD=pass
export MYSQL_DATABASE=movie-ratings
This is generally considered a good practice because it keeps the sensitive information separate from the codebase and allows for easy configuration management.
Install Atlas
To download and install the latest release of the Atlas CLI, simply run the following command in your terminal:
$ curl -sSf https://atlasgo.sh | shInstall Click
Next, you need to install Click. Run the following command to install Click and its dependencies:
$ pip install click You can verify that Click is installed by opening a Python shell and typing the following command:
>>> import clickInstall MySQL Connector/Python
The first step in interacting with a MySQL server is to establish a connection. To do this you need a database connector — a piece of software that allows an application to connect and interact with a database system. For example, if you need to connect a Java application to a MySQL database, then you need to use the MySQL JDBC connector, which follows the Java Database Connectivity (JDBC) API.
The official MySQL Connector for Python is developed and maintained by Oracle Corporation. You can install it by running the following command in your terminal:
$ pip install mysql-connector-pythonTo test if the installation was successful, type the following command on your Python terminal:
>>> import mysql.connectorIf the above code executes with no errors, then mysql.connector is installed and ready to use.
Defining the Database Schema
We will use the Atlas DDL (data-definition language) to describe the desired database schema and use the command-line tool to plan and apply the migrations to the MySQL movies_db.
The schema will include three tables:
- `movies`: containing information about each movie, including the title, genre, and year of release.
- `reviewers`: containing the first name and last name of each reviewer.
- `ratings`: associates each rating with a movie and a reviewer. It includes a foreign key constraint on `movie_id` and `reviewer_id` to ensure that ratings can only be added for movies and reviewers that exist in the database.
The `movies` and `reviewers` tables will have a many-to-many relationship since one movie can be reviewed by multiple reviewers and one reviewer can review multiple movies. The `ratings` table will connect the `movies` table with the `reviewers` table.
Atlas allows you to manage your database schemas in an IaC approach. To create a table declaratively using Atlas, you need to use a schema object that describes a database in MySQL. Create a new file called schema.hcl in your project’s root directory. Open the file and paste the following contents and then save.
schema "movie-ratings" {
  charset = "utf8mb4"
  collate = "utf8mb4_0900_ai_ci"
}

table "movies" {
  schema = schema.movie-ratings
  column "id" {
    null = false
    type = int
    auto_increment = true
  }
  column "title" {
    null = true
    type = varchar(255)
  }
  column "genre" {
    null = true
    type = varchar(255)
  }
  column "year" {
    null = true
    type = int
  }

  primary_key {
    columns = [column.id]
  }
}
In MySQL and MariaDB, the schema resource can contain the charset and collate attributes.
Apply the schema above by executing the atlas schema apply command:
$ atlas schema apply \
  -u "mysql://root:pass@localhost:3306/movie-ratings" \
  --to file://schema.hcl
Running the command above will apply the following changes:
CREATE TABLE `movie-ratings`.`movies` (`id` int NOT NULL AUTO_INCREMENT, `title` varchar(255) NULL, `genre` varchar(255) NULL, `year` int NULL, PRIMARY KEY (`id`));Let’s now add two more blocks to our schema. Paste the following in the file and then save:
table "reviewers" {
  schema = schema.movie-ratings
  column "id" {
    null = false
    type = int
    auto_increment = true
  }
  column "first_name" {
    null = true
    type = varchar(255)
  }
  column "last_name" {
    null = true
    type = varchar(255)
  }
  primary_key {
    columns = [column.id]
  }
}

table "ratings" {
  schema = schema.movie-ratings
  column "rating" {
    null = false
    type = int
  }
  column "reviewer_id" {
    type = int
  }
  column "movie_id" {
    type = int
  }
  foreign_key "reviewer_id" {
    columns     = [column.reviewer_id]
    ref_columns = [table.reviewers.column.id]
  }
  foreign_key "movie_id" {
    columns     = [column.movie_id]
    ref_columns = [table.movies.column.id]
  }
  primary_key {
    columns = [column.movie_id, column.reviewer_id]
  }
}
Now migrate the schema by rerunning the atlas schema apply command:
$ atlas schema apply \
  -u "mysql://root:pass@localhost:3306/movie-ratings" \
  --to file://schema.hcl
Output:
-- Planned Changes:
-- Create "reviewers" table
CREATE TABLE `movie-ratings`.`reviewers` (`id` int NOT NULL AUTO_INCREMENT, `first_name` varchar(255) NULL, `last_name` varchar(255) NULL, PRIMARY KEY (`id`));
-- Create "ratings" table
CREATE TABLE `movie-ratings`.`ratings` (`rating` int NOT NULL, `reviewer_id` int NOT NULL, `movie_id` int NOT NULL, PRIMARY KEY (`movie_id`, `reviewer_id`), CONSTRAINT `reviewer_id` FOREIGN KEY (`reviewer_id`) REFERENCES `movie-ratings`.`reviewers` (`id`), CONSTRAINT `movie_id` FOREIGN KEY (`movie_id`) REFERENCES `movie-ratings`.`movies` (`id`));
Write the Python Click CLI Application
Now that the database is all set up, and all the dependencies have been installed, it’s time to create our application.
# Import the required libraries
import click
import mysql.connector
from mysql.connector import Error
import os

@click.group()
def cli():
    pass


if __name__ == '__main__':
    cli()
We start by importing the necessary modules to work with Click and MySQL. The @click.group decorator defines a command group, which is a way to organize related commands. The cli() function is the entry point for the command-line interface and is called if the script is run directly.
The if __name__ == ‘__main__’: statement ensures that the cli() function is only executed if the script is run directly and not imported as a module.
Finally, the cli() function is called, which initializes the command-line interface and starts listening for user input. This means that when the script is run, the user will be able to execute commands through the CLI.
The next step is connecting our application to the database. Let’s define a simple function for connecting to the database:
def get_database_connection():

    # Connect to the MySQL database using environment variables
    connection = mysql.connector.connect(
        host=os.environ['MYSQL_HOST'],
        database=os.environ['MYSQL_DATABASE'],
        user=os.environ['MYSQL_USER'],
        password=os.environ['MYSQL_PASSWORD']
    )
    return connection
This function connects to a MySQL database using the mysql.connector library that imported earlier, using environment variables to get the necessary credentials (`MYSQL_HOST`, `MYSQL_DATABASE`, `MYSQL_USER`, and `MYSQL_PASSWORD`).
Let’s now look how to create a simple function for adding movies into the database:
# Define a command-line command and the options a user can pass
@click.command()
@click.option('--title', prompt=True, help='Title of the movie')
@click.option('--genre', prompt=True, help='Genre of the movie')
@click.option('--year', prompt=True, type=int, help='Year of release')

# Define the function that will be called when the command is run
def add_movie(title, genre, year):
    """Add a movie to the database"""
    try:
        # Connect to the MySQL database
        connection = get_database_connection()

        # Create a cursor object to execute SQL queries on the db
        cursor = connection.cursor()

        # Construct the SQL query to insert the new movie into the db
        sql_query = f"INSERT INTO movies (title, genre, year) VALUES ('{title}', '{genre}', {year})"

        # Execute the SQL query using the cursor
        cursor.execute(sql_query)

        # Commit the changes to the database
        connection.commit()

        # Print a message indicating that the movie has been stored
        click.echo(f"Added movie {title} ({genre}, {year}) to the database")

    # Catch any errors that occur while connecting to the database
    except Error as e:
        click.echo(f"Error while connecting to MySQL: {e}")

    # Close the database connection and cursor
    finally:
        if connection.is_connected():
            cursor.close()
            connection.close()
Here’s a breakdown of what this function does:
- @click.command() is a decorator that turns the function into a command-line command that can be run in a terminal.
- @click.option() is used to define command-line options that the user can pass to the command. In this case, there are three options:
- `–title`: The title of the movie. This option is marked as prompt=True, which means that if the user doesn’t provide a value for it when running the command, they will be prompted to enter one.
- `–genre`: The genre of the movie. This option is also marked as prompt=True.
- `–year`: The year of release of the movie. This option is marked as prompt=True and type=int, which means that the user must enter an integer value for it.
- The function itself is called `add_movie`, and it takes three arguments: title, genre, and year. These arguments correspond to the command-line options defined above.
- The function then creates a cursor object to execute SQL queries on the database.
- The SQL query to insert a new movie into the database is constructed using the arguments passed to the function, and executed using the cursor’s execute() method.
- The changes are committed to the database using the connection.commit() method.
- Finally, the function prints a message to the terminal indicating that the movie has been added to the database.
If an error occurs while connecting to the database or executing the SQL query, the function catches the error and prints an error message to the terminal. Regardless of whether an error occurs, the function closes the database connection and cursor at the end of the function using the `finally` block.
Next, let’s create a function `add_reviewer` for adding new reviewers:
# Define a command-line command and the options a user can pass
@click.command()
@click.option('--first_name', prompt=True, help='First name of the reviewer')
@click.option('--last_name', prompt=True, help='Last name of the reviewer')

# Define the function that will be called when the command is executed
def add_reviewer(first_name, last_name):
    """Add a reviewer to the database"""
    try:
        # Connect to the MySQL database
        connection = get_database_connection()

        # Create a cursor object to execute SQL queries on the db
        cursor = connection.cursor()

        # Query to insert the reviewer into the reviewers table
        sql_query = f"INSERT INTO reviewers (first_name, last_name) VALUES ('{first_name}', '{last_name}')"

        # Execute the SQL query using the cursor
        cursor.execute(sql_query)

        # Commit the changes to the database
        connection.commit()

        # Print a message indicating that the reviewer has been added
        click.echo(f"Added reviewer {first_name} ({last_name}) to the database")

    # Catch any error that occurs while connecting to the database
    except Error as e:
        click.echo(f"Error while connecting to MySQL: {e}")

    # Close the database connection and cursor
    finally:
        if connection.is_connected():
            cursor.close()
            connection.close()
This code provides a simple and secure way to add reviewers into a MySQL database. As with the previous function, here we are using the `click.option()` to define two command-line arguments: `–first_name` and `–last_name`, which are required and will be prompted for if not supplied by the user.
The `os.environ` function is used to retrieve the necessary credentials. The `try` block contains a SQL query to insert the supplied `first_name` and `last_name` into the reviewers table. A cursor is created to execute the SQL query. The query inserts the supplied values.
If the execution of the query is successful, the changes will be committed to the database and a message will be printed to confirm that the reviewer has been added otherwise an error message will be printed.
Finally, let’s define our `add_rating` function which pretty much follows the same format.
# Define a CLI command
@click.command()
@click.option('--title', prompt=True, help='Title of the movie')
@click.option('--reviewer', prompt=True, help='Name of the reviewer')
@click.option('--rating', prompt=True, type=float, help='Rating for the movie')
def add_rating(title, reviewer, rating):
    """Add a rating for a movie"""
    try:
        # Connect to the database
        connection = get_database_connection()

        # Create a cursor object to execute SQL queries on the db
        cursor = connection.cursor()

        # Query to insert the ratings into the ratings table
        movie_query = f"SELECT id FROM movies WHERE title='{title}'"

        # Execute the SQL query using the cursor
        cursor.execute(movie_query)

        # Fetch the first row of the result
        movie_id = cursor.fetchone()[0]

        # Query to get the reviewer's ID from the reviewers table
        reviewer_query = f"SELECT id FROM reviewers WHERE first_name='{reviewer}'"

        # Execute the SQL query using the cursor
        cursor.execute(reviewer_query)

        # Fetch the first row of the result
        reviewer_id = cursor.fetchone()[0]

        # Query to insert the rating into the ratings table
        rating_query = f"INSERT INTO ratings (movie_id, reviewer_id, rating) VALUES ({movie_id}, {reviewer_id}, {rating})"

        # Execute the SQL query using the cursor
        cursor.execute(rating_query)

        # Commit the transaction to the database
        connection.commit()

        # Print a success message
        click.echo(f"Added rating {rating} for movie {title} by reviewer {reviewer}")

    except Error as e:
        # Print an error message if something goes wrong
        click.echo(f"Error while connecting to MySQL: {e}")

    finally:
        # Close the cursor and connection objects
        if connection.is_connected():
            cursor.close()
            connection.close()
When the command is executed, it connects to a MySQL database and inserts a new movie rating into the database based on the user’s input. Specifically, the command retrieves the movie ID and the reviewer ID by executing SELECT queries against the movies and reviewers tables in the database, respectively. Then, the command inserts the rating into the ratings table by executing an INSERT query.
You can download the application code from this gist:
https://gist.github.com/tonykurya/92ba205c0059960b21416cc46b9469c7
At this point, your project’s root folder should have 3 files and one directory for your virtual environment as shown in the following tree structure:
cli-demo/
├── .env
├── app.py
├── schema.hcl
├── myenv/
     ├── bin/
     │   ├── activate
     │   ├── pip
     │   ├── python
     │   └── ...
     ├── include/
     │   ├── python3.9/
     │   └── ...
     ├── lib/
     │   ├── python3.9/
     │   └── ...
     ├── share/
     │   ├── doc/
     │   └── ...
     └── pyvenv.cfg
You can now run the application using the python <filename>.py <command> command, where <filename> is the name of your Python file, in this case, app.py, and <command> is one of the three commands defined in the script. For example:
$ python app.py add-movie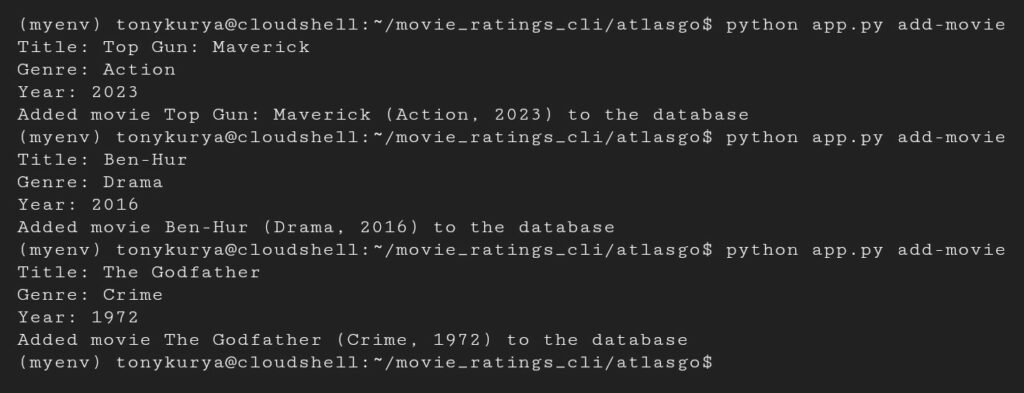
$ python app.py add-reviewer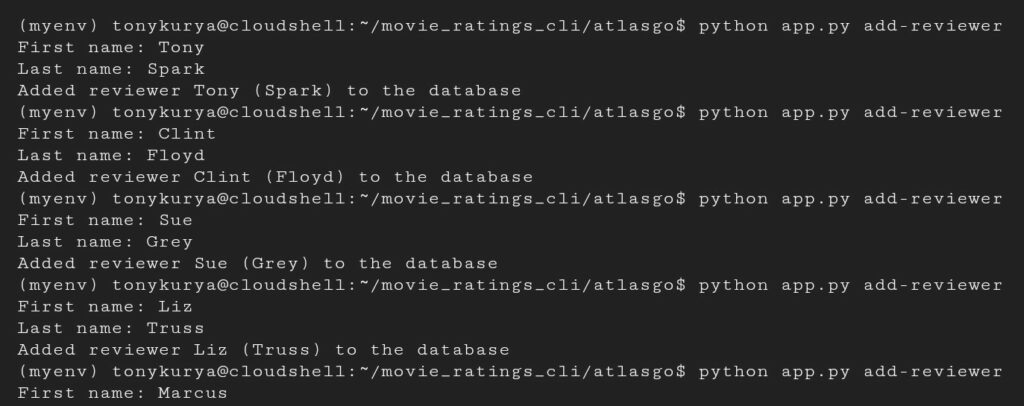
$ python app.py add-rating
Wrapping Up
Congratulations! You learned how to write a simple CLI application in Python! You also learned how to connect your application to a database as well as how to create tables declaratively using Atlas.